Now the Concord.
It now has a few minor feature additions. First is independent left/right span. You can set the span of context texts on the right and left independently.
So if you want to see more on the right of the keyword, you can set the span on the left to a smaller number of characters and set the right one to a larger number. So the result would look like this:
The second is wider context word span. In the current working version, you can only search context words up to 5 words to the right and left and you can only search single words. With the new version, you can search up to 10 word on the right and left of the keyword and you can search a phrase. To enable wider context words, go to Preferences -> Concord and check
Wide Context.
Now you can select up to 10 words on the right or left.
On the preferences, you can select Words Only or Words and Phrases for context word search.
This means you can search like this:
You can also specify words you don't want to see in the context. This means if the specified word(s) appear in the specified span, that line will be excluded from the result. To enable this, check Exclude right next to the Context Word Mode setting (see above). A text box and span settings for Excluding words appear on the main window. Check the box next to Exclude and search the keyword.
The result would look like this:
In this example, a word 'the' should not appear on the left and the right of the keyword with in 10 words (if this is working correctly).
Another feature is font selection. With the current working version, you can only select Courier or Courier New (or appropriate font might be chosen for non-alphabetic languages). Now you can select any font on your system. To do this, go to Preferences -> Concord and click Manage in the Display setting.
A font panel appears. You can select a font from Pop-up menu and click Add to add to the list. To remove a font from the list, just select a font and click Remove.
You can now select this added font.
Another feature is related to copy/paste or export kwic results. If you want to paste copied lines on Pages or MSWord or any application that accepts Rich Text Format text, you can paste the lines with the keyword in bold. Check Keep text style when copying the results.
If you paste the text on a document, the copied text preserves the font, font size and bold text on the keywords.
You can also insert a tab before and after the keywords. This works with a plain text format and rich text format. Check Insert Tab before/after Keyword.
The pasted text should look like these:
Plain Text
Rich Text
This setting (tab) should work when you export the results.
Another feature is editing the original/database text. First, you need to enable this in Preferences. You can allow editing of the original file and editing of database files.
For Allow editing of original file, you can select Only in File Mode or In Both Modes.
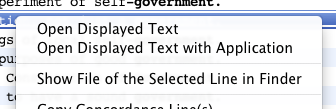
If allow editing of original file is on, after you run Concord and select a line on the table, right-click (or go Main Menu -> Text Data) the table.
If you select Open Displayed Text, a editor panel appears.
You can edit the original text file and save the changes. This comes in handy when you find errors in the kwic result. This has a basic tagging helper function. You specify tags on Tag Panel and then open Tag Drawer and click the number next to the tag text to insert a tag.
If you select Open Displayed Text with Application, the file opens with a specified application (the default is TextEdit).
In Database Mode, you can edit a database entry.
Select Edit Database Entry of the selected Line.
You can make changes and update the entry or delete the entry.
If the original text file is in the same directory when you created the database, you can select Open Displayed Text with Application to open the file with a specified application.
And in both modes, if you select Show File of the selected Line in Finder, the original text file will be displayed in Finder (of course if the file is still in the same directory in Database mode).
Another minor addition is searching text in the Context view. You could just copy and paste to search any word you find in the Context view, but you can directly do it in the Context view. Just select a word (or phrase) in the Context view and right-click to select Search in Concord.
Finally, I will briefly go over how tag-handling works.
In Preferences, you can select Tag(s). Tag Only mode does not work in Concord because looking at kwic lines of just tags does not make much sense.
Once you select the Tag(s) mode, select a tag type.
In Tag(s) mode, you can run kwic just by typing tags. This example search 'jj nn' (adjective + noun) combination.
You can suppress tags in the context. In Preferences, check Suppress tags in context.
Then the results should look like this:
But this suppressing tags in context has one issue. When you click a kwic result line, the displayed context text and keyword coloring in the context text is not correct. I will fix this if I can find a good way, but until then, this remains as is.